


In the first part of this article we’ve argued that there are three basic ways to find a security camera’s IP address:
- Use the manufacturer’s IP locator software
- Use a third-party IP scanner
- Find the IP address of the camera on the router’s settings
The first two ways were discussed in the previous part of this article, now we’re going to delve into the last way.
![]() How to Find the IP Address of Your Security Camera? (Part I)
How to Find the IP Address of Your Security Camera? (Part I)
3. Detect the camera’s IP address on the router settings
Another way to figure out the security camera’s IP address is by inspecting the devices connected to the router. If you access your router, you should see all the “DHCP clients” or the attached devices.
Basically, all the devices connected to the router or to the switch under the router will be listed on the router settings. It’s like the router is saying “these are the devices that I can see on my end”.
All you have to do is inspect the list, rule out the devices that are not cameras such as “phone”, “printer”, etc until you locate the camera’s address. Sometimes the brand name of the camera will be displayed on the list (for example “Geovision” or “Irivision”).
Additionally, the camera’s IP address can be identified using the MAC address of the camera which is listed on the camera’s box. The MAC address is a unique identifier that links the devices to the manufacturer, the address can be found on the label or sticker of the package (sometimes it’s on the camera itself).
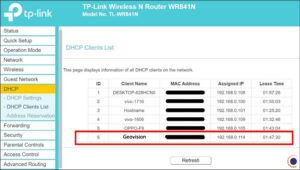
For example, access the router by its default IP address (usually it’s 192.168.1.1 or 192.168.0.1), enter the password of the router, and navigate to the attached devices. Inspect the list carefully and locate the camera (either by identifying it via the MAC address or simply the manufacturer’s brand name).
Do you need the camera’s IP address if you’re using a PoE NVR?
Technically you don’t need to find out the IP address of the camera if you’re using an NVR with a built-in PoE switch. In this case, the cameras are not plugged into an external switch or router, instead, they go straight to the back of the NVR.
The NVR will auto-detect the cameras, assign them a unique IP address, activate them automatically by giving the cameras the same credentials as the NVR, and then they’ll just show up on the screen.
Most of the newer NVR work like this, there’s no need to do any configuration, they’re designed to be plug and play. However, if the cameras are not new and were used with another NVR, then you need to find the camera’s IP address and reset the settings to default so the new NVR can auto-detect them.
Note: The PoE NVR will automatically place the camera on a subnet, meaning this IP camera address is only used for video transmission from the camera to the NVR. You can then access the recordings and live view after connecting NVR to a monitor. You can’t access the camera individually, you can access them through the NVR only.
How to access the camera via web browser using the IP Address?
The IP address of the camera needs to be modified to match the router’s IP address. For example, if the router’s IP address is 192.168.1.1, then the camera’s IP address should be the same format 192.168.1.XXX where XXX is a number between 2 and 254. We commend using a higher range to avoid any IP conflicts, let’s say set the camera’s IP address to 192.168.1.100.
Some logic, if the router’s address is 192.168.0.1, then the camera should be in the same format (for example 192.168.0.100). Or if the router’s address is 10.0.0.1, then the camera can be set on 10.0.0.100. To get the idea, the camera’s IP address has to match your local network.
Once you have identified and properly modified the IP address of the camera, you can access the camera directly via the web browser. Open your browser, preferably Internet Explorer or Mozilla Firefox, and type the IP address of the camera or the recorder (NVR, DVR). For example http://192.168.1.100.
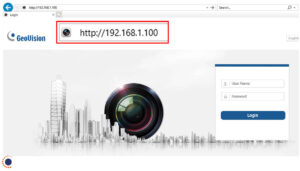
If everything is okay, you should see the login screen. Sometimes the camera will ask the user to install plugins, install them, and refresh the page. Then type the username and the password of the camera.
You should see the live view of the camera and the configuration or the setting page (the terms depend on the brand name). On the settings, you can make adjustments on the camera such as image parameters, color improvement, or network settings such as frame rate, bandwidth, compression type, etc.
In other words, all the settings that the camera offers can be adjusted by accessing it via a web browser using the IP address.
Some parameters that you need to pay attention to are the ports. These ports are used to access the camera remotely via a phone app or a computer. There are four main ports:
- HTTP port (for remote computer access),
- Server port (for phone apps)
- RTSP port (for remote streaming) and
- ONVIF port (to hook up the camera on a third-party software/app).
You may need to modify these ports and make them unique, or you can leave the default values. Depending on the camera’s brand, you may need to open (port forward) one or all of them on the router for remote access.
However, for the new camera models, there’s no need to do any port forwarding, they’re designed differently and all you have to do is install the camera’s phone app and scan the QR code on the box or on the settings page. Then you should see all the cameras.
This new technology is called P2P and allows the user to easily access the camera’s live streaming locally and remotely by using the UID (unique ID) number or the camera.
Conclusion
To find the IP address of your security camera is quite easy, the fastest method being the one where you use the IP finder tool provided by the manufacturer of the camera. Simply download the software that works for your camera, install it, and then scan the network. The camera will be listed there and you can modify the password accordingly.
Other methods include using a generic IP scanner tool such as the one explained above, or just checking the router’s settings and inspecting the devices connected to it.
Source: Security Cam Center