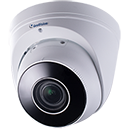


Nowadays almost all CCTV security cameras come with built-in IR LED lights that enable the camera to see into the dark and record black and white videos. These lights are infrared type and their illumination can be seen by the camera’s sensor only. With the naked eye, it will look dimly red.
By default, the IR LED lights are enabled on the camera and they will turn on automatically when the area under surveillance becomes dark. Technically, there’s a light sensor in the camera that switches the lights on/off when certain illumination levels are reached (such as at dusk or sunset).
However, in certain circumstances (like what we discussed in this article: Security Cameras: Working behind Glass Windows), the user may need to turn off the infrared lights on a security camera. Let’s say you have enough light at your location and the IR lights are messing up the picture, in that case, you may need to manually turn off the IR lights.
Related articles:
![]() Security Cameras: Working behind Glass Windows (Part 1)
Security Cameras: Working behind Glass Windows (Part 1)
![]() Security Cameras: Working behind Glass Windows (Part 2)
Security Cameras: Working behind Glass Windows (Part 2)
![]() Top 5 Tips on Where to Place Home Security Cameras (Part 1)
Top 5 Tips on Where to Place Home Security Cameras (Part 1)
![]() Top 5 Tips on Where to Place Home Security Cameras (Part 2)
Top 5 Tips on Where to Place Home Security Cameras (Part 2)
This article offers a few suggestions on how to turn off the infrared lights on a CCTV security camera. Disabling the IR lights can be an easy task (for cameras that have the option on the settings) or pretty complicated if the IR lights are embedded on the camera.
How to Turn Off the Infrared Lights on Security Camera
There are two ways how you can turn off the infrared lights on the camera: either via the cameras’ settings or by disconnecting the IR block directly on the camera’s motherboard.
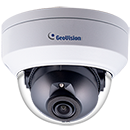
Many cameras, mostly the IP ones, have an option to disable the infrared lights on the settings. Other cameras have no such option and you need to open up the camera and physically disconnect the cable that powers up the infrared lights.
Turn off the IR lights on the camera’s settings
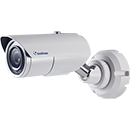
Many IP security cameras offer extended settings that can be adjusted. You can disable the infrared lights by accessing the IP camera via the web browser and locating the IR light tab. The settings can depend on the camera’s model, but the logic should be the same.
Below we will show you how to turn off the infrared lights for an IP camera. Regardless of the model, the steps are the same. First, locate the IP address of the camera and type it on the URL bar of your web browser.
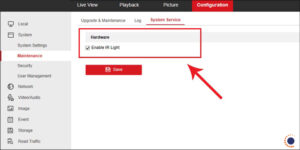
Once you see the login screen, enter the username and the password of the camera. Navigate to the settings and locate the IR lights section. In this example, you need to go to Configuration > System > Maintenance > System Service and there you’ll see the Enable IR Light option.
Note: If you’re not sure if your IP camera has this option, contact the seller and ask them for information. Usually the latest IP cameras, regardless of the manufacturer, come with the option to turn off the infrared lights.
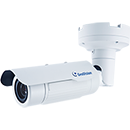
- Analog HD cameras
HD Analog cameras cannot be accessed via the web browser. However, these types of cameras have OSD (on-screen display) settings that can be navigated using the buttons on the camera’s pigtail.
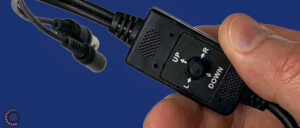
Locate the pigtail button and press the centered button. The OSD menu should show up on the screen and it will display various settings such as Video Format, Exposure, Day/Night, Video Settings, Functions, Factory Reset, etc.
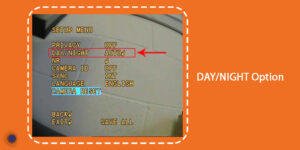
In most cases, the infrared light settings are hidden under the Day/Night option. If you click it, you should see another menu. You need to locate the OFF option (which means turn off the IR lights), or in some instances, you have to select “COLOR” or “EXTERNAL”. It depends on the camera’s model. If you’re not sure, apply the settings and cover the camera with the palm and see if the IR lights come on.
Disconnect the cable from the infrared lights block
If the security has no option to turn off the IR lights on the settings section, you can physically unplug the cable that powers the IR lights block. Usually, the infrared lights are located around the camera’s eye (sensor) and the block is connected to the camera’s motherboard via a short cable.
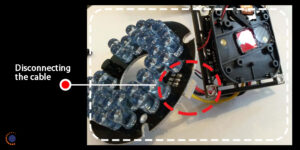
This cable is used to power up the camera’s light. It’s possible to disconnect the cable and the whole IR light block will not work anymore. The security camera will work fine, just the IR lights won’t turn on anymore. In case you change your mind, you can plug back the cable.
In some cameras, the connection between the IR lights block and the main circuit (camera’s motherboard) is soldered. Trace the cable and if necessary but the cable. However, be careful because it’s difficult to reconnect again if you change your mind.
Conclusion
As we explained above, there are two basic ways to turn off the infrared lights of a security camera; you can turn off the IR lights on the camera’s settings. Or if this option is missing, you can physically disconnect the cable that powers the IR lights.
Once the infrared lights are disabled, the camera will not be able to see in the dark unless there’s enough light in the environment and there’s no need for the camera’s built-in IR LED lights.
Source: Security Cam Centre