One important, but often neglected consideration in video surveillance systems design is the trade-off between image resolution and field of view. Amid such trade-off, how to ensure image quality becomes critical. Lens selection also plays a key role in image quality optimization and it will be discussed in two articles.
Understanding the Trade-off Between Image Resolution and Field of View (Part II)
Resolution definitions
Resolution has many definitions; no one definition is correct for all situations. Here we list only the definitions relevant to video in surveillance and machine vision applications.
- Definition 1: Resolution can be expressed as the number of pixel rows or columns on the sensor used to record an image. The greater the number of lines, the greater detail or larger field of view can be recorded with the camera.
- Definition 2: Resolution can be expressed as the total number of pixels. With megapixel cameras, the resolution is generally the total number of pixels, divided by 1,000,000, and rounded off.
- Definition 3: Resolution can be the level of detail with which an image can be reproduced or recorded. At the image sensor resolution is expressed as line pairs per millimeter (lpm) commonly used by lens designers and optical engineers.
- Definition 4: Resolution can be specified in pixels per foot or meter at the object. This mapping of the image sensor dimensions onto the object is most intuitive for calculating what level of detail can be seen in the image.
Image Resolution vs. Field of View
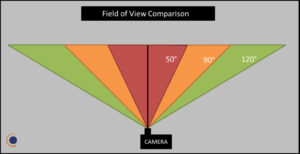
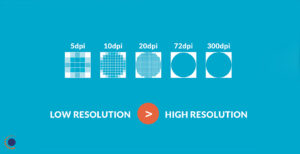
With any given combination of camera and lens, the native resolution from the camera is spread over the entire field of view of the lens, determining pixel density and image resolution. The wider the resolution is spread, the lower the pixel density, the lower the image resolution or image detail. The widest field of view allows you to cover the widest area but does not allow you to see high detail, while the narrowest field of view permits capture of high detail at the expense of wide area coverage.
Other Ways to Improve Image Detail
First is the distance from the camera to the subject. If possible, the installer could improve the image detail by moving the camera closer to the subject. This may be feasible in a new installation, but in an existing system this may be limited by the physical constraints of the location and the system, as well as costs associated with re-cabling. Moving closer improves the image detail, but field of view is reduced.
The second variable that may be changed is the camera resolution. By selecting a higher resolution camera with a higher starting number of pixels and spreading them over the same field of view as before, the pixel density will be higher and the resulting image detail will be better. Of course, this assumes you can make that change in your system and you can support the likely higher priced hardware and data storage needs required with higher resolution systems. The higher resolution, data intensive cameras will also lower the frame rate of the system which must also be kept in mind especially with industry specific standards and requirements.
Use Available Tools
There are many useful tools available to help support systems design and correct equipment selection. Some companies deliver their own image resolution and lens calculator. The calculator allows you to input some important details of your application and potential equipment, then quickly calculates image resolution with those assumptions. You input the camera resolution and sensor size you intend to use, the lens field of view you believe you need, then input your key project variables – either how much resolution you think you need in terms of pixel density, how much coverage you need in distance (feet or meters), or how far away the camera is from the subject. The tool then calculates the other variables for you.
For example, you indicate you plan to use a 5 megapixel ½.5” sensor camera, a 3 mm lens and you will be 50 feet away from your subject. The tool will calculate your pixel density – in this case 27 pixels/foot, and coverage width – here 97-feet wide. The tool then provides an image that represents the level of image resolution you would get for your selected variables allowing you to quickly see if you have enough resolution to meet the needs of your application.
The newest smartphone and tablet versions of these calculator App include enhancements that allow users to input the camera height and/or camera angle so that one can tell if a person’s head, for example, will be covered in the image given different distances from the camera. The latest version also allows the user to introduce a level of jpeg noise so that the resulting image more accurately reflects real world conditions.
Adapted from a&s Magazine
